Creating & Managing Controls
The Settings tab in the apps is used to create/edit/delete as well as size and position them.
Before you can use a control on the Controls tab, you must create it on the Settings tab.
The Settings Tab
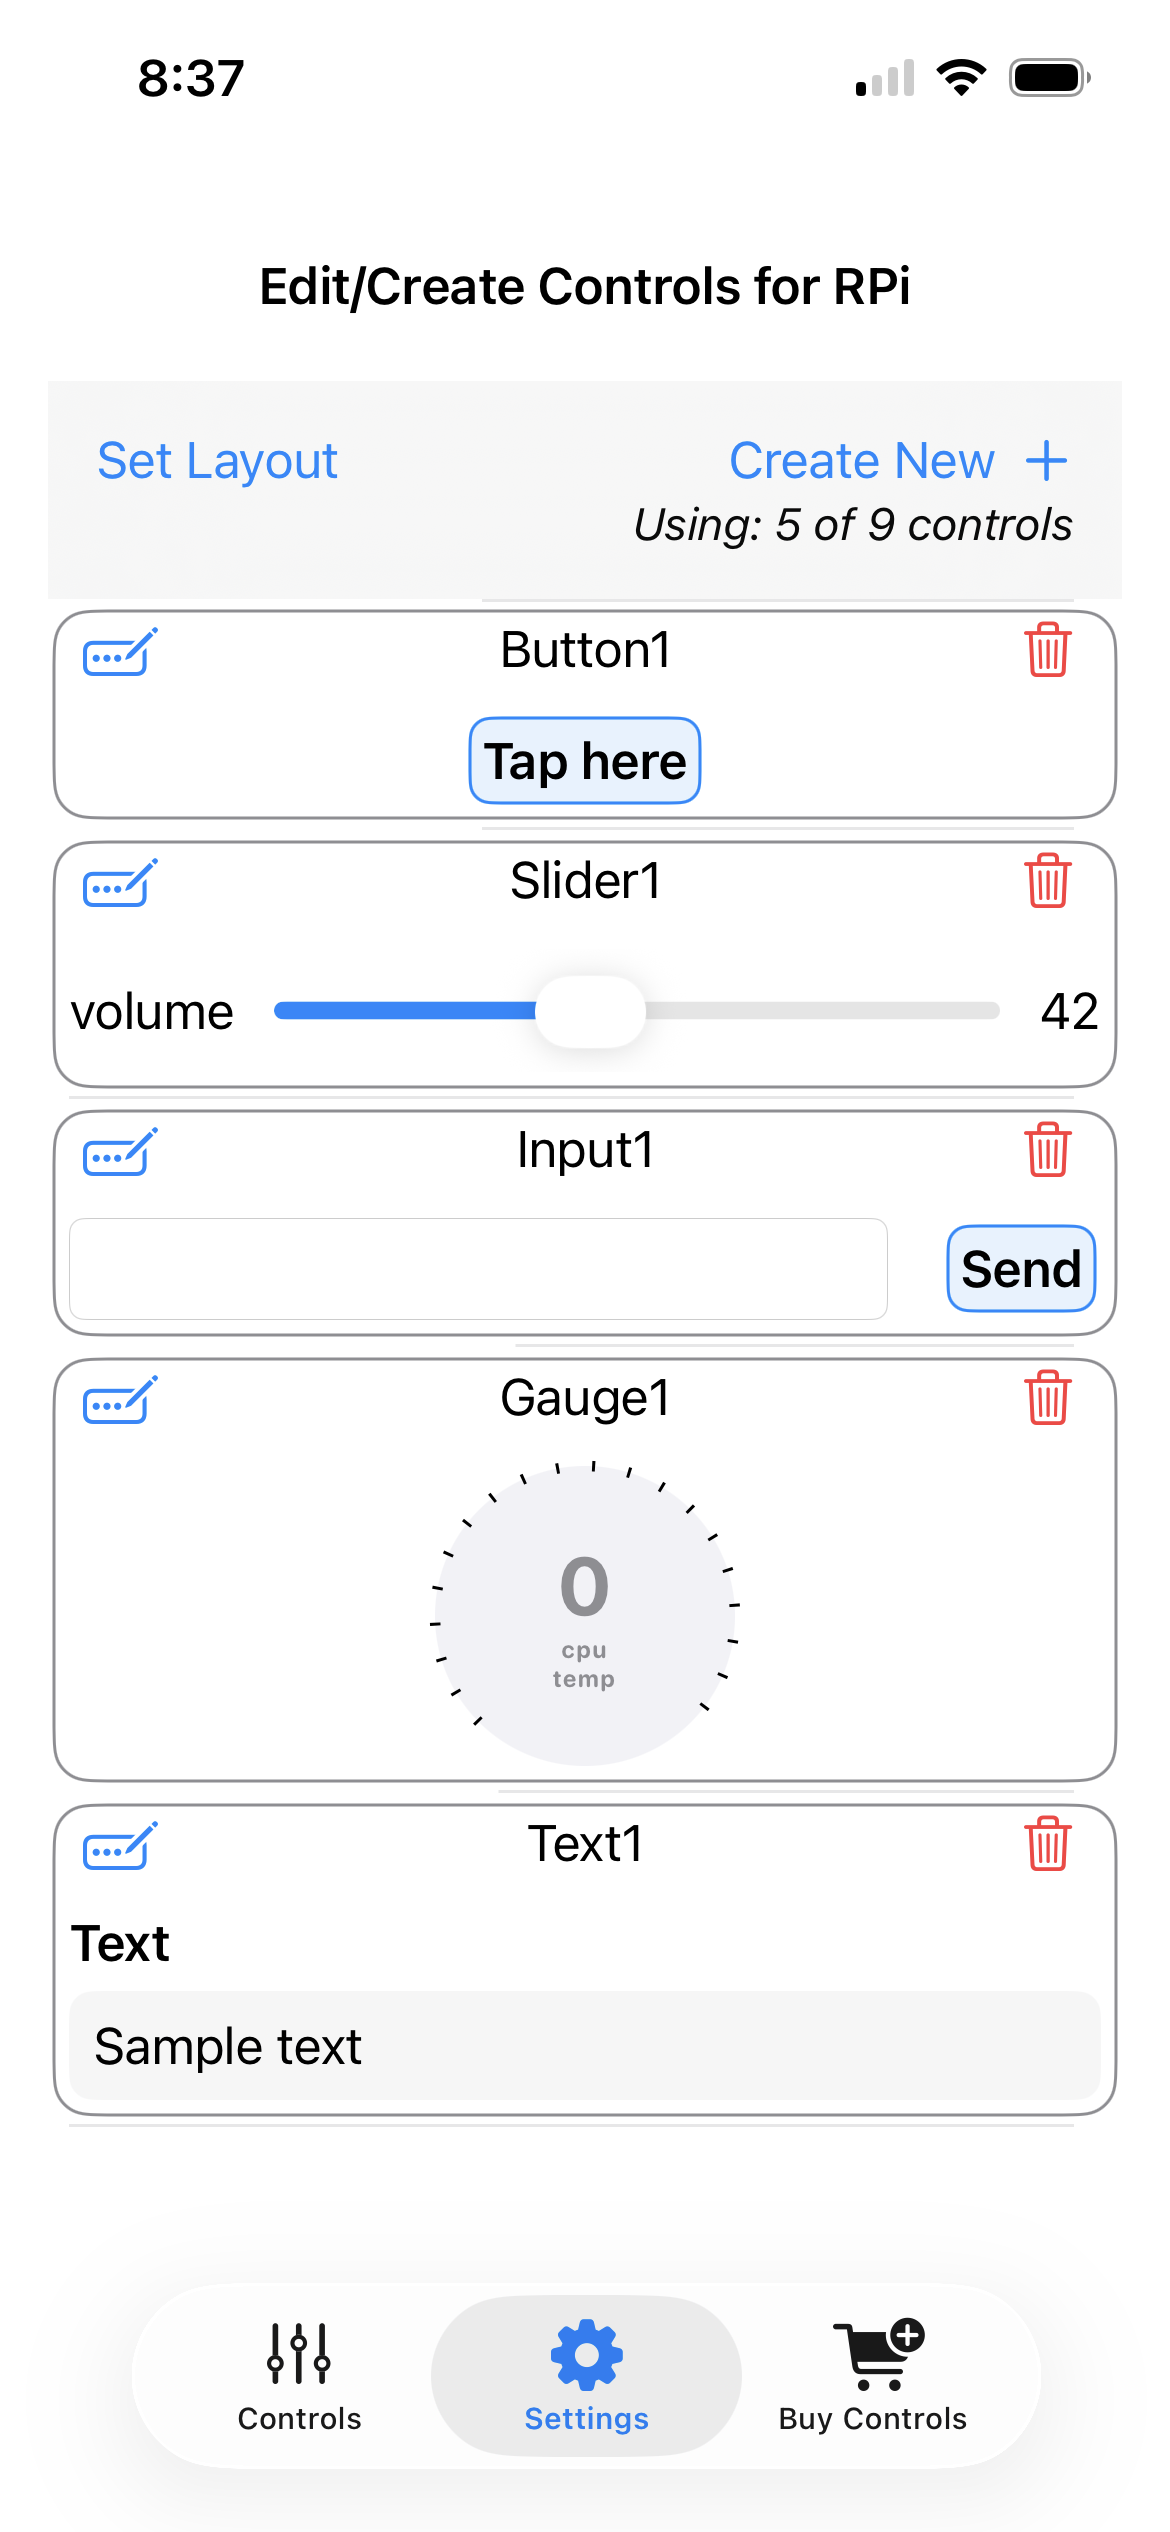
This is an example of the Settings (editing) screen - with 5 controls already created:
Create New + (blue text button)
Located top right. Use this to create a new control. Tapping this button displays a list of all available controls (Scroll down to see them all)
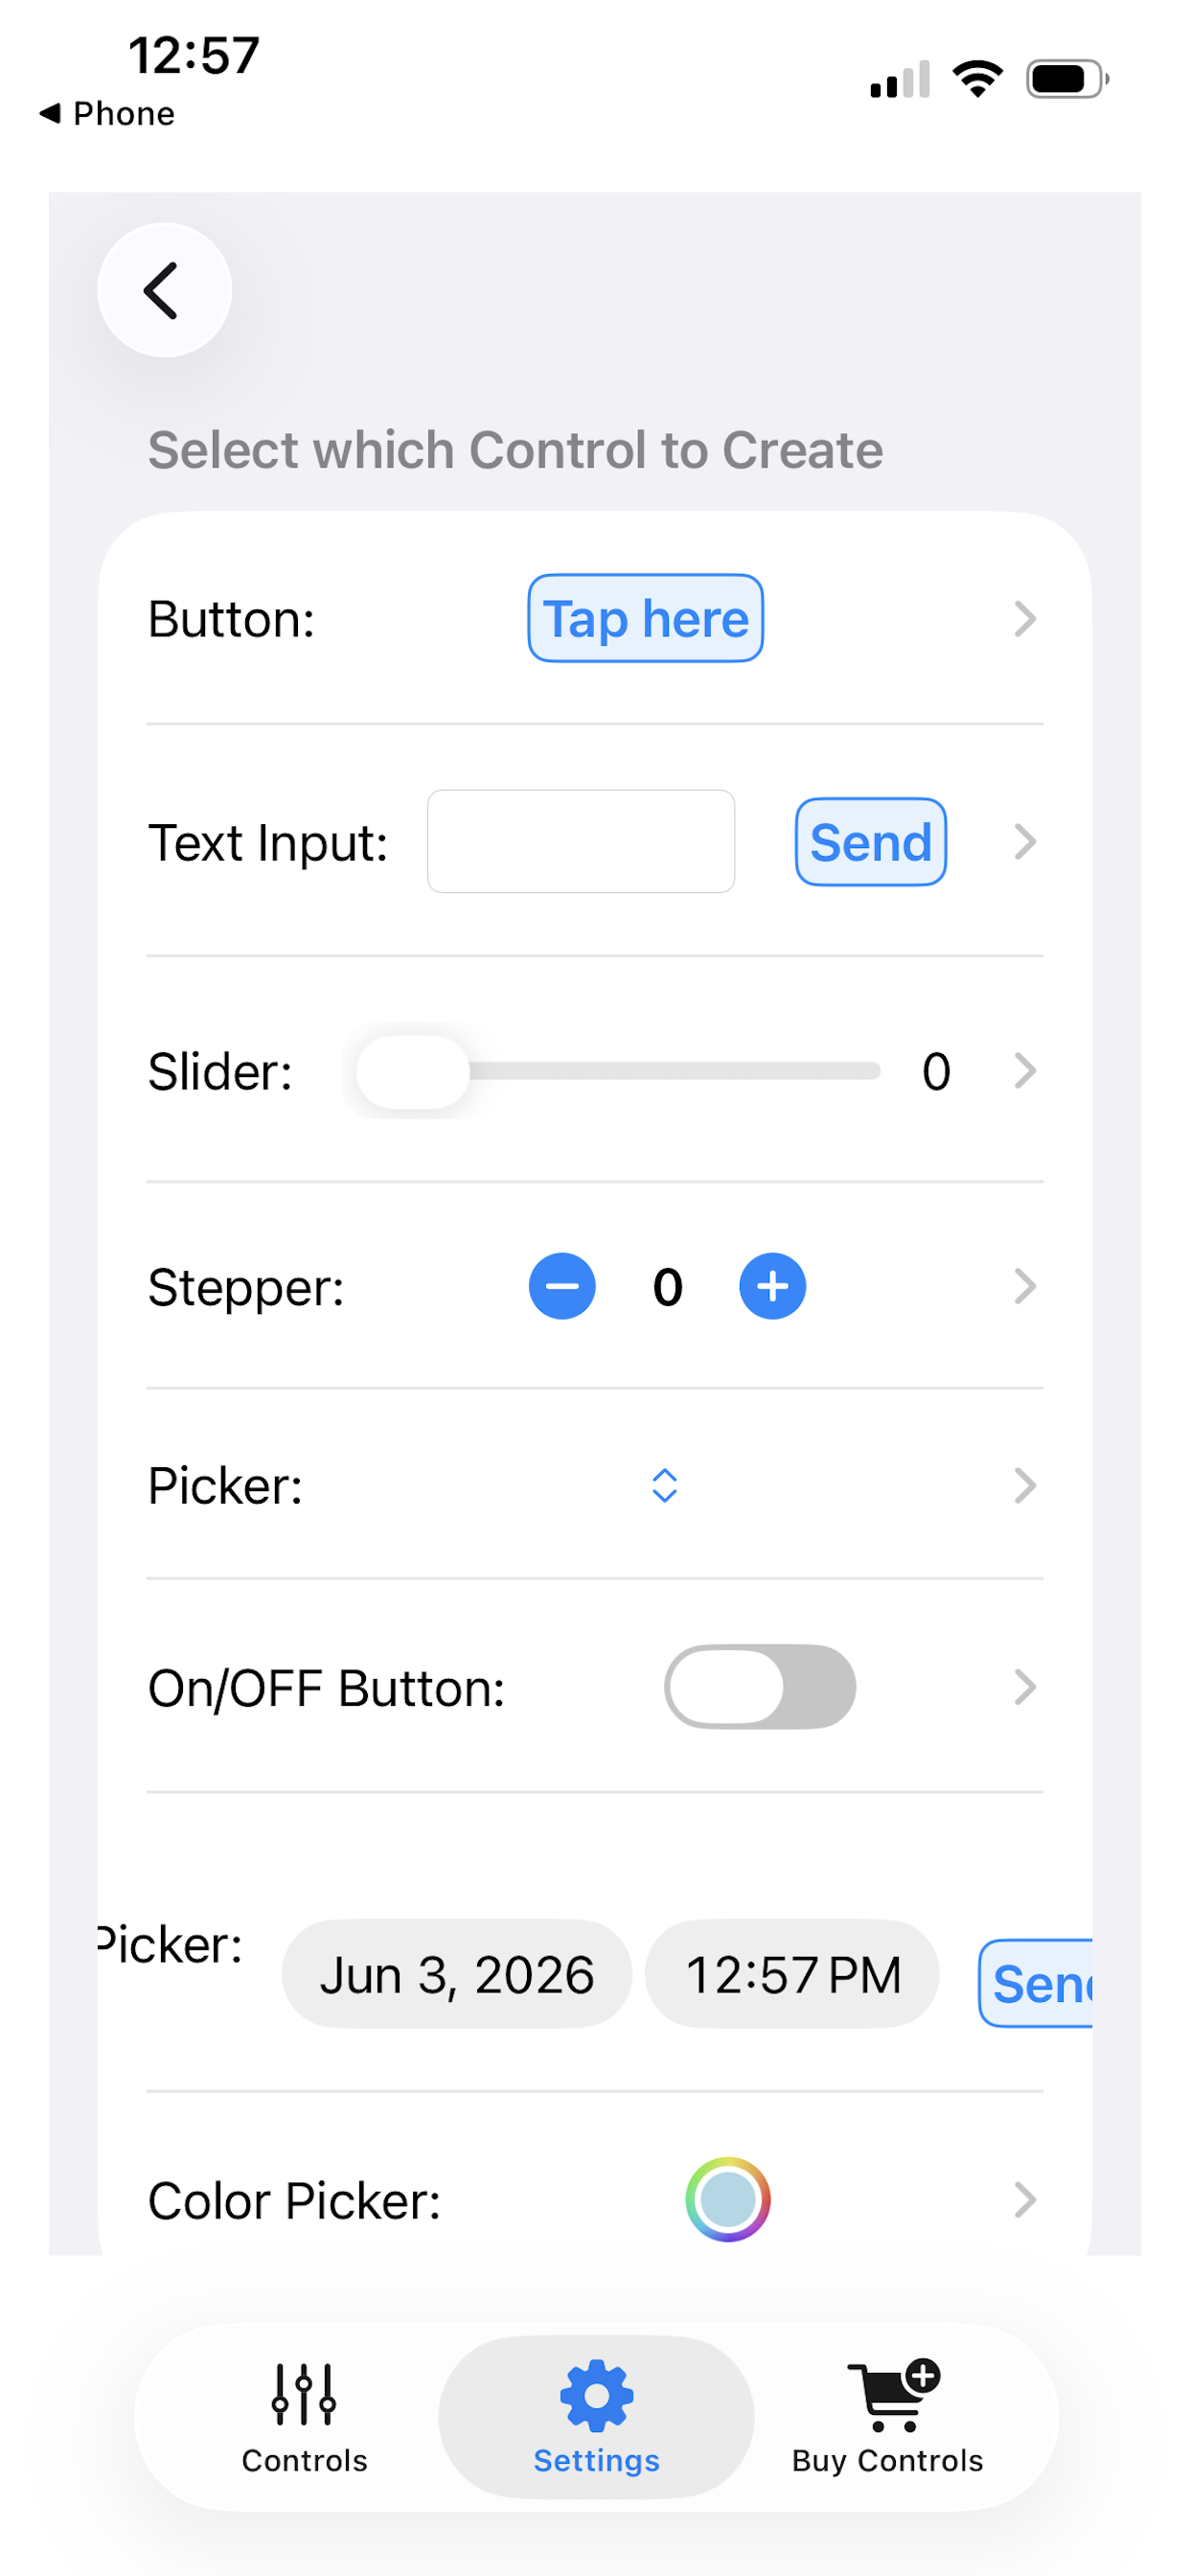
The list provide a visual display of what each control looks like, and some may be manipulated (with no effect on RPi). Tap on the grey chevron (right) to select the control.
The corresponding create/edit parameter panel corresponding to the selected control is displayed. Here is the slider control edit panel:
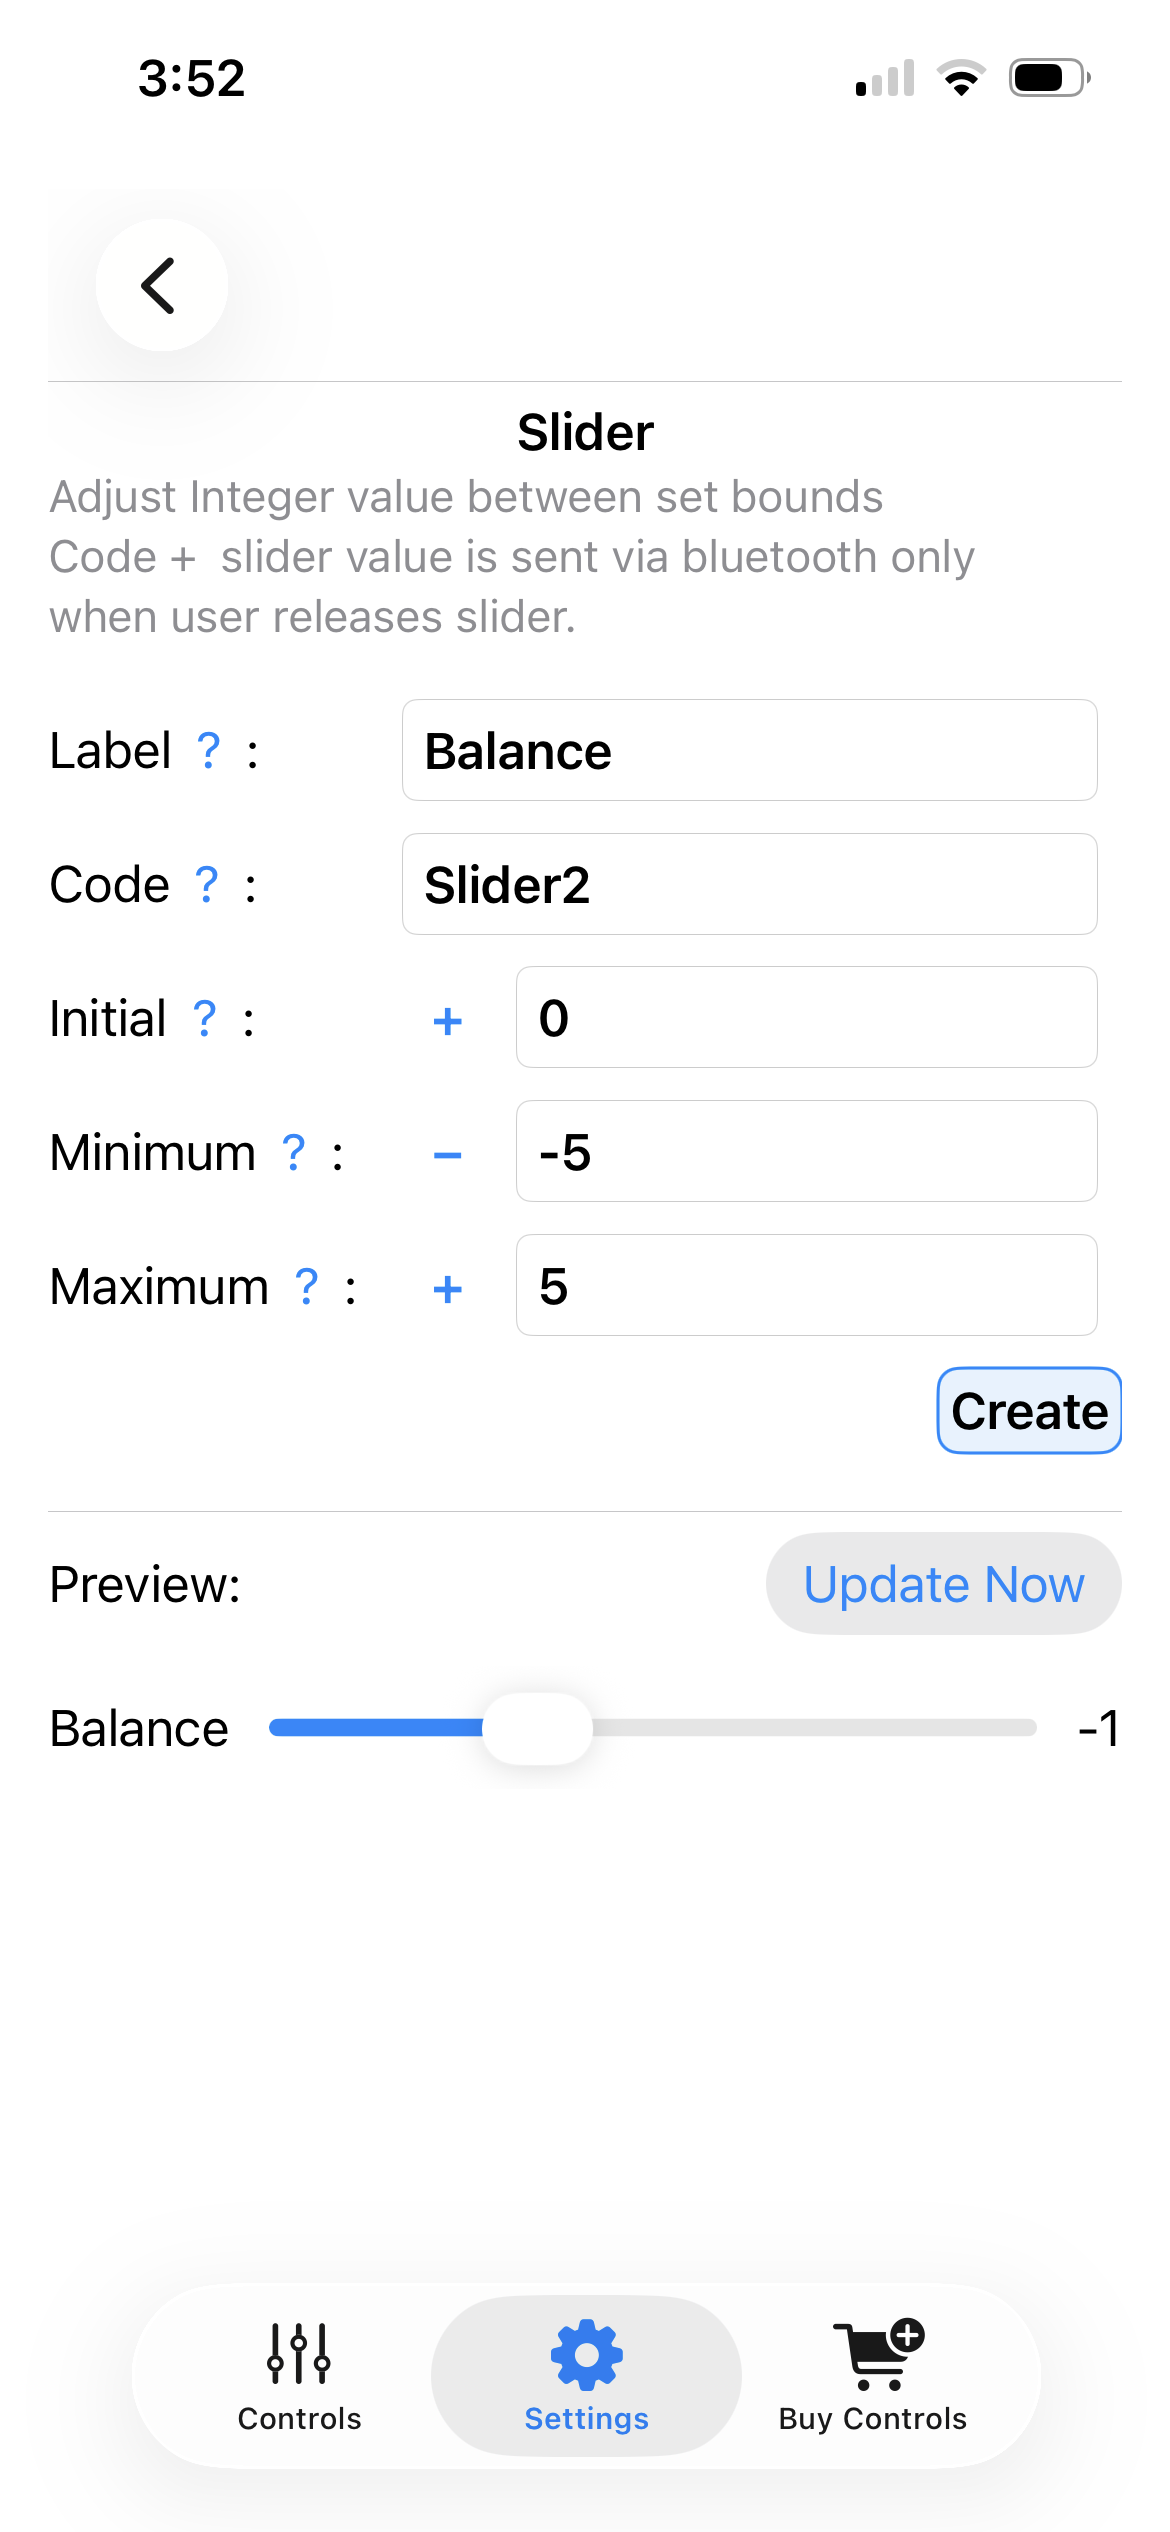
- Enter a label and set the va;lue parameters. tap +/- in front of the text box to change the sign of the number.
- to hide the keyboard - tap the red hide button (not shown in pic)
- you can view a preview of the control, and operate it by tapping
update now - when satisfied - tap the blue Create button : you are returned to the list of controls created - with this new control added.
The Code line, is pre-filled by the app. It suggest a unique (not yet used) identifier for this control. You will use this identifier to register a handler in the RPi Python code for this control. You may change the code of the control if you wish - but it must be unique.
Edit/Delete an existing control
The list of controls in the settings tabs, displays the actual control created.
- Above the control display (top row - middle) is the code identifier for this control (provides a quick reference to set up the handler in the python code)
- top row left: The blue pen icon is the edit button. Tap this to be returned to the corresponding control's parameter entry screen.
- top row right: The red garbage can icon. Tap this to delete the control. Deleting the control is not reversible. It reduces the control account (allowing for the creation of a different control).
It is not possible to edit the type of a control (ie you cannot convert a slider into text input for example). You must delete the control and create a control of the desired different type.
Positioning & sizing: the Set Layout button
Tap the blue Set Layout button located top left on the settings screen, to bring up the positioning/sizing screen.
This allows you to set the size of the control and the position where they will be displayed on the Controlstab.
Note that sizing/positioning does not affect the Settings tab list of controls. Only the Controls Tab.
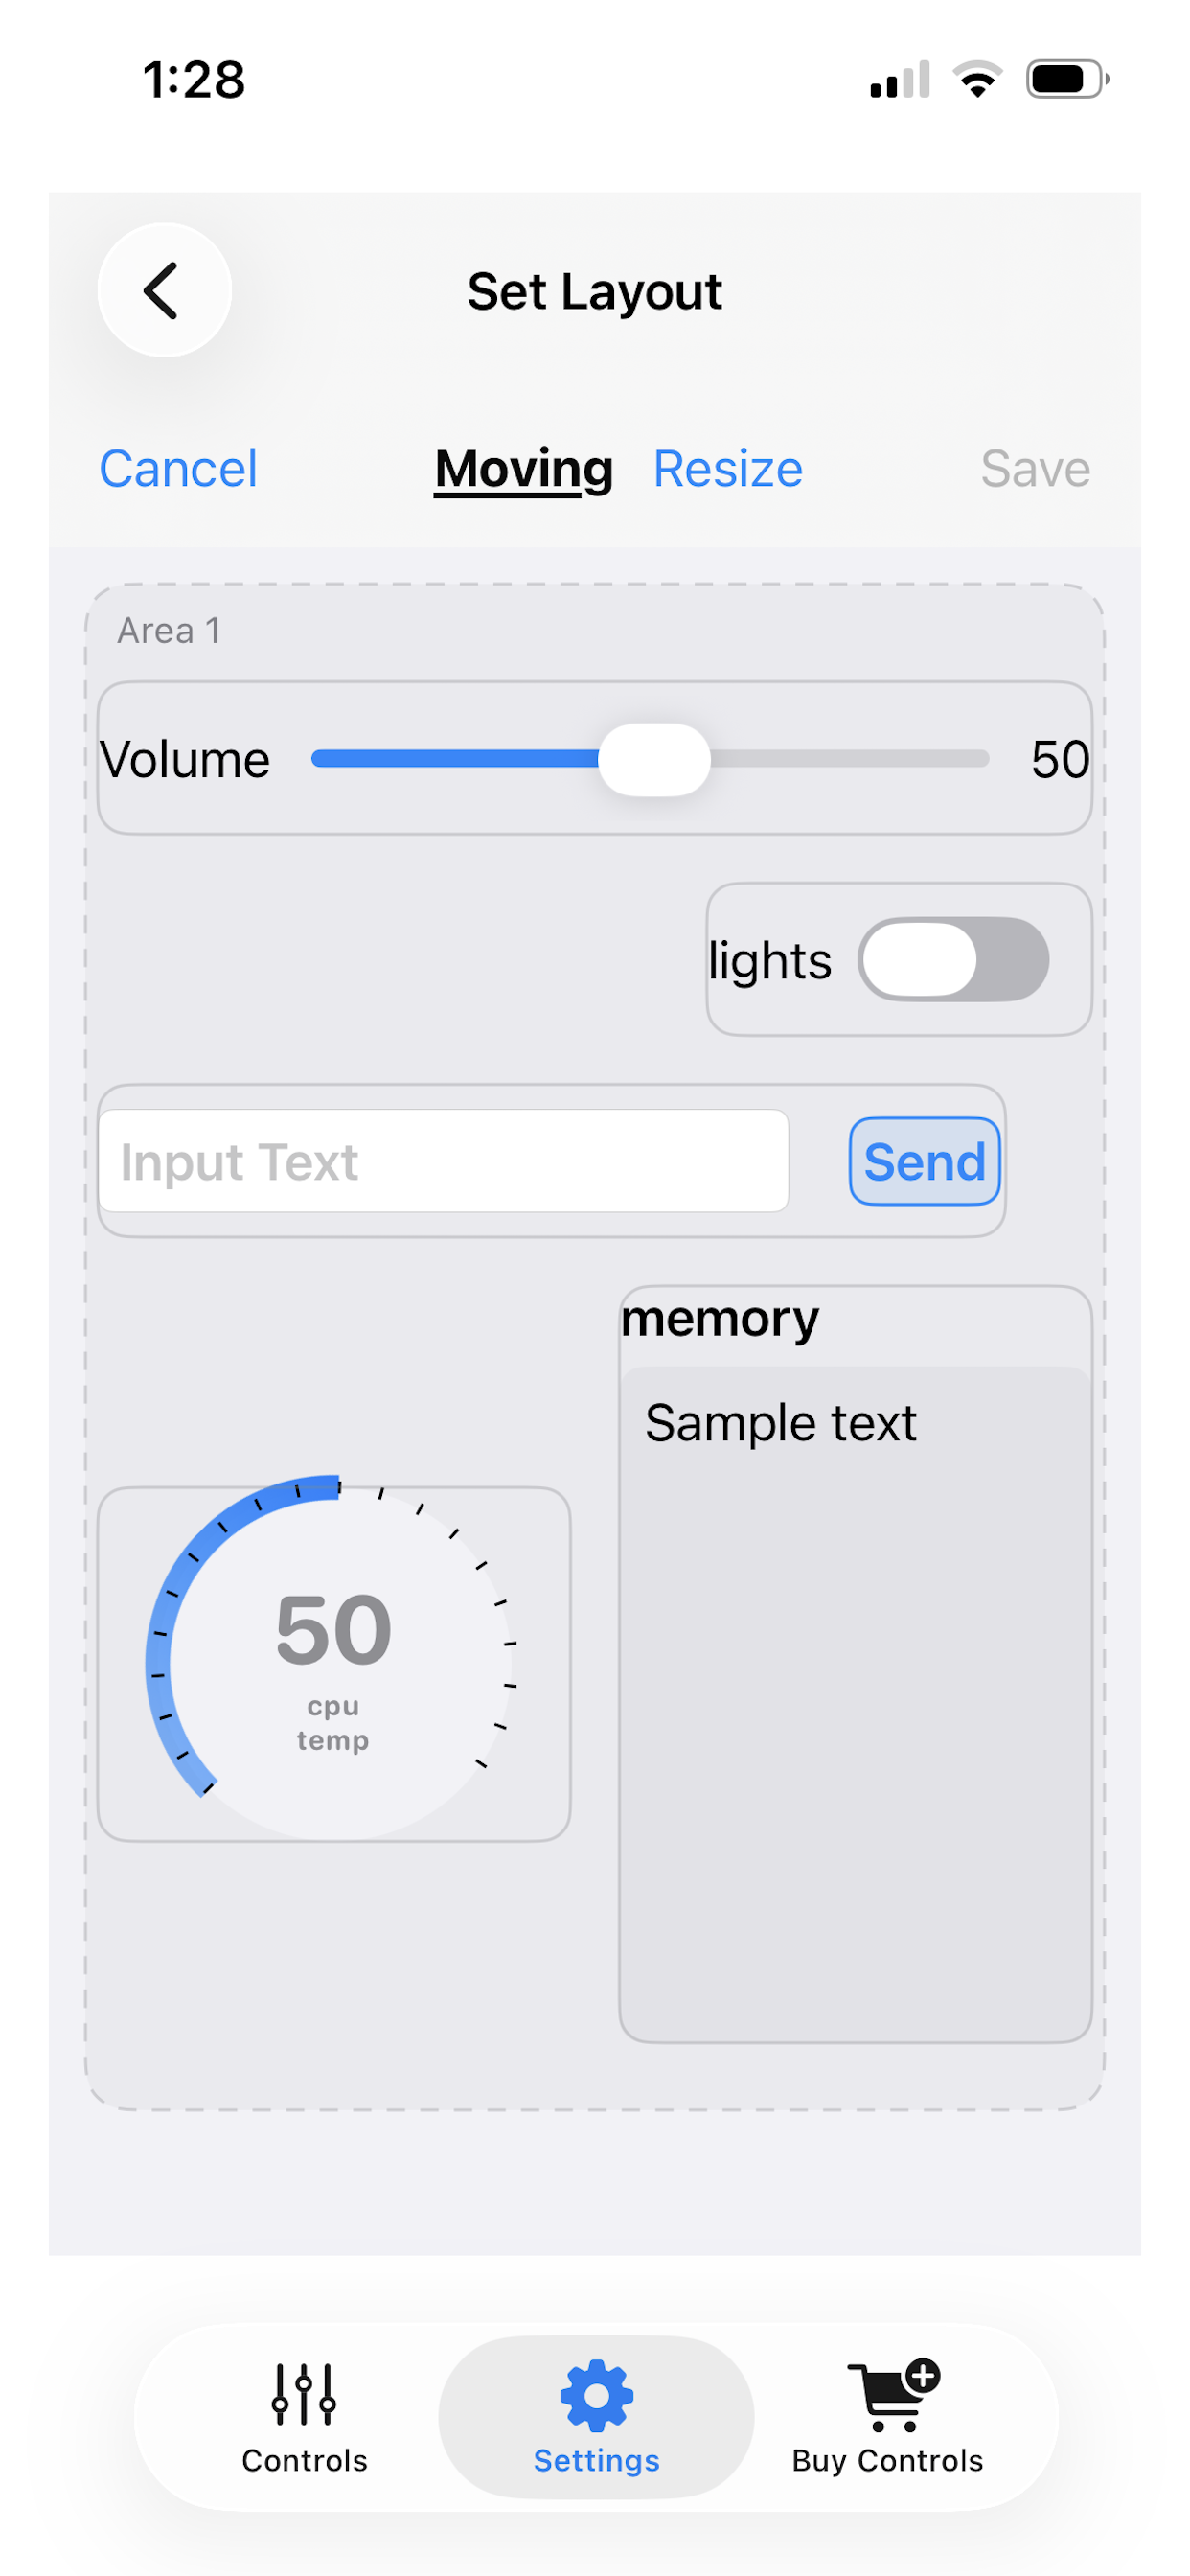
Tap the blue Resize Button to resize controls.
- Grab abd drag the small blue arrows that appear in the bottom corner of a control to resize it.
- A red frame appears around the control while it is being resized.
- Note that other controls will move, after you let go of the sizing handle to match the new size.
Tap the blue Move button to position controls on the screen.
- grab the control and move it where you want to.
- other controls will move below a dragged control after you let go.
- controls can be fitted side by side if there is room.
- Do not forget to tap the Save button, when done.
In landscape mode, or on the ipad, the screen is separated in two zones, one left and one right. You can move controls to either zones. On the iPhone: Note that if you use the two zones in landscape mode, and you then rotate the screen to portrait , the two zones will be displayed one under the other - and you may need to scroll he screen to view all the controls. If the zone to the right is empty, it will not be displayed in portrait mode.
How many controls do you need?
The Settings screen displays how many controls you have created towards the maximum number controls allowed. In the screen shot above, we see that we have created 5 controls out of 9 available (2 free + 7 purchased).
The app provides 2 controls free, which allows for testing the ability to control the RPi. You can keep changing the type of controls by deleting and recreating a control.
If you need more controls, use the Buy Controls Tab, to purchase more controls, in packs of 1,3,5 or 9 for a modest fee.
If you reinstall the app, or you install the app on a second iPhone/iPad with the same Apple ID, you can restore purchases
Controls are synched between devices. If you create a control on your iPhone, it will appear on your iPAd when you restart the app. Similarly if you delete a control on one device, it will be delete from the other device when you restart the app.